Table of Contents

As well as being a powerful way of presenting your message, videos can be a great way to segment your list.
After all, someone who watches your video all the way through is WAAAAY more interested than someone who watches 30 seconds, right?
So, how useful would it be if you could separate out the most interested segment of your list, and perhaps reward them with a special offer or more advanced information?
Do you think that might help you create more raving fans and customers?
Thought so… that’s why we created Video Events.
AWtomator video events work with any YouTube, Wistia or Vimeo video, and setup is as simple as dropping a line of code into your web page along with your existing video embed code.
As well as letting you move, copy, tag or trigger AWeber Campaigns for subscribers who view the video, you can also make a call to action appear at a certain point in the video, and let returning visitors continue where they left off.
And our video events are stackable, so for example, you can:
- Send video consumption reminders to subscribers who stop watching too early
- Reward those subscribers who pay closest attention
Here’s how to set one up…
Step 1: Create a Video Event in AWtomator

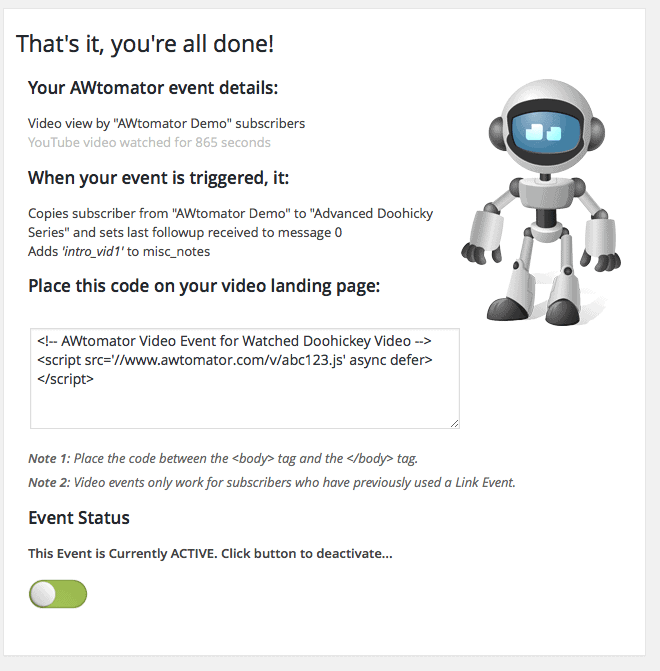
Firstly, we will set up our AWtomator Video Event. In the example image above, you can see that when a subscriber gets 865 seconds (which is 14 minutes and 25 seconds) into the video (YouTube in this case), we are going to:
- Copy them to our “Advanced Doohickey Series” list
- Set the last followup message to 0 (i.e. the beginning)
- and tag them with the tag, “into_vid1“.
TIP:
You can set the event to delay the action for a few days if you want to make sure they don’t get emailed right away by AWeber.
Step 2: Paste The Code Into Your Web Page

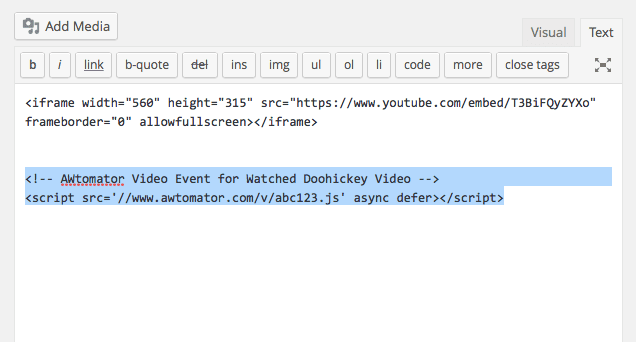
Next, you simply edit your web page, and paste in the Video Event code. The Event Code needs to be placed somewhere between the <body> and </body> tags.
Right underneath your video embed code should be just fine.
TIP:
You can add multiple video events to a video page. For example, you could tag viewers who reach the halfway point (or the start of your sales pitch) in one video event, then use a second video event to re-tag the ones who then went on to the end.
Step 3: Send Subscribers To the Video
Now your video event is all set up, you are ready to send your subscribers to watch the video…
(Sorry, were you expecting it to be more complicated? 🙂 )
So, all you have to do is to compose a followup (or broadcast) email in AWeber, and link to your video page using an AWtomator Link Event.
See the “How Do I Tag Subscribers With AWtomator?” tutorial for detailed steps on how to setup Link events.
Important Notes
Both Video and Page View events rely on AWtomator being able to identify the AWeber subscriber currently visiting your web page.
There are a number of ways you can feed this information to AWtomator, depending on your skill level and website / funnel software.
PRO: Set a global Javascript variable called “awt_email”
If you know the email address of the person on the page (e.g. they are logged in) then you can set a global Javascript variable called awt_email before the page event code snippet.
For example:
<script>window.awt_email='[email protected]'</script>
MODERATE: Add a URL parameter
If there isn’t an awt_email variable set, AWtomator will then look at the page URL to see if there is an email set using the “awt_email”, “email”, or “e” query parameters.
For example:
https://www.yoursite.com/page/[email protected]
Many funnels add an email parameter automatically when they redirect the user from the lead capture form to the content.
DEFAULT: Use an AWtomator Link Event
If you haven’t made the subscriber’s email available using the methods above, then AWtomator will try to identify the subscriber by cookie or ip address.
These will be set if the subscriber has used an AWtomator Link Event on that device or at that location at some point in the past.
To ensure your subscriber is identified as reliably as possible, we recommend inserting a link event as your list’s Success Page URL.
See our Pageview Event Best Practice tutorial for more details.

